■ GSAP
○ GSAP 이란?
GreenSock Animation Platfrom 은 인터랙티브 웹을 위한 요소로
화려한 애니메이션과 스크롤 이벤트를 쉽게 구현할 수 있도록 도와주는
타임라인 기반의 JS 라이브러리임
○ CDN 세팅
<script src="https://cdn.jsdelivr.net/npm/gsap@3.12.5/dist/gsap.min.js"></script>
■ GSAP 기초
○ 기본 메서드
- gsap.to()
움직임의 끝나는 점을 지정하는 애니메이션
원래 위치에서 해당 위치로 변경한다.
gsap.to("대상",{속성:값, 속성:값},딜레이);

gsap.to(".box1",{x:200, duration:2},3);
// 클래스가 .box1인 대상을 x축으로 200으로 2초간 이동해줘 3초이후에
- gsap.from()
애니메이션이 지정된 속성에서 시작하여
현재 속성으로 이동
gsap.from(".box", { duration: 2, x: -100, opacity: 0 });
- gsap.fromTo()
요소의 시작과 끝을 모두 지정
gsap.fromTo(".box", { x: 0, opacity: 0 }, { duration: 2, x: 100, opacity: 1 });
- gsap.timeline()
여러 애니메이션을 시퀀스(단계별)로 관리
const tl = gsap.timeline();
tl.to(".box", { duration: 1, x: 100 })
  .to(".box", { duration: 1, rotation: 360 });
- gsap.kill()
지정된 애니메이션을 중지 하거나 제거
const tween = gsap.to(".box", { x: 100 });
gsap.kill(tween);
- gsap.play() / pause() / resume() / reverse() / restart()
애니메이션의 재생, 일시정지, 재개, 역방향 재생, 다시 시작 등을 제어하는 메서드
const tween = gsap.to(".box", { duration: 2, x: 100 });
tween.pause();  // 애니메이션 일시정지
tween.resume(); // 애니메이션 재개
tween.reverse(); // 애니메이션 역방향 실행
tween.restart(); // 애니메이션 처음부터 다시 시작
- 간단한 예시
<style>
    .cont{
        height: 500px;
        font-size: 80px;
        text-align: center;
        align-content: center;
        border: 1px solid #000;
    }
    .box1{
        width: 100px;
        height: 100px;
        background-color: aqua;
    }
    .box2{
        width: 100px;
        height: 100px;
        background-color: rebeccapurple;
    }
</style>
<body>

    <div class="cont">
        content1
    </div>
    <div class="cont">
        <div class="box1"></div>
        <div class="box2"></div>
    </div>
    <div class="cont">
        content3
    </div>


    <script>
        gsap.to(".box1",{x:200, duration:2},2);
        gsap.to(".box2",{x:200, duration:2},3);
    </script>
</body>
○ 자주사용하는 속성
- duration (지속시간) 초단위 지정
- delay (지연시간) 초단위 지정
- ease (이징) 애니메이션의 가속도와 감속도를 제어하여 움직임 설정 " " 사이에 작성
| linear (선형) | 일정한 속도로 진행 |
| power1 ~ power4 | 애니메이션 속도를 조절하는데 사용, 숫자가 크면 가속도및 감속이 급격 .in : 천천히 시작한 후 가속 .out : 빠르게 시작하여 천천히 멈춤 .inOut : 천천히 시작하여 중간에 가속되고 다시 천천히 멈춤 |
| bounce (탄성) | 애니메이션이 끝날 때 물리적 탄성효과 .in : 튕기며 시작 .out : 튕기며 끝남 .inOut : 시작과 끝 모두 튕김 |
| back (당기는효과) | 살짝 반대로 당기는 듯한 효과를 줌 .in : 당긴 후 앞으로 .out : 종료 후 약간 당김 .inOut : 시작과 종류 모두 당김 |
| expo (지수적 가속) | 점점 가속되거나 점점 감속 .in : 천천히 시작하여 매우 빠르게 가속 .out : 빠르게 시작하여 천천히 감속 .inOut : 부드럽게 시작 끝나는 가속 감속 효과 |
| steps(x) | x에 숫자값을 넣어서 사용 ease : "steps(5)" // 5단계로 끊어서 |
- x, y (픽셀값) 요소를 이동시킴
transform: translate(x, y);
기본값이 있으면 +=하면 그만큼 더 이동
gsap.to(".box", {
duration: 2,
x: 100, // 요소를 좌측에서 100px로 이동 (현재 위치와 상관없이 100px 지점으로)
y: 50 // 요소를 상단에서 50px로 이동
});
gsap.to(".box", {
duration: 2,
x: "+=100", // 현재 위치에서 100px 더 이동
y: "-=50" // 현재 위치에서 50px 위로 이동
});- opacity (투명도) 투명있게 변경 0~1
- scale (배율) 크기를 배율로조정
- rotation (회전) 도 단위로 지정 360 한바퀴 회전
- repeat (반복횟수) 1넣으면 기본1회 + 1회 (-1) 무한 반복
- repeatDelay(반복 지연시간) 반복하는 사이의 지연
- yoyo (왕복) (true) 왕복해줌 repeat 을 1넣으면 다시돌아옴
- stagger (격차) 여러 요소에 넣었을때 지연 시간을 두어 순차적으로 애니메이션이 시작됨
- transformOrigin (변형기준점) : 50% 50% 요소의 특정 곳을 기준으로 변형
- backgroundColor : "red" or #ff00ff 등으로 넣어줌
- keyframes(단계지정)
gsap.to(".box", {
  duration: 3, // 전체 애니메이션 지속 시간 3초
  keyframes: [
    { x: 100 },  // 0 ~ 0.75초 동안 x: 100으로 이동
    { y: 100 },  // 0.75 ~ 1.5초 동안 y: 100으로 이동
    { rotation: 180 }, // 1.5 ~ 2.25초 동안 회전
    { scale: 1.5 }     // 2.25 ~ 3초 동안 크기 조정
  ]
});
■ ScrollTrigger
○ ScrollTrigger
스크롤에 따라서 애니메이션 실행 여부를 설정해준다.
○ CDN 세팅
<!--gsap-->
<script src="https://cdn.jsdelivr.net/npm/gsap@3.12.5/dist/gsap.min.js"></script>
<!--스크롤 트리거-->
<script src="https://cdn.jsdelivr.net/npm/gsap@3.12.5/dist/ScrollTrigger.min.js"></script>
○ 기본사용법
- 기본 세팅
<style>
    .cont{
        height: 150vh;
        font-size: 80px;
        text-align: center;
        border: 1px solid #000;
    }
    .box{
        width: 100px;
        height: 100px;
        background-color: aqua;
    }

</style>
<body>

    <div class="cont">
        content1
    </div>
    <div class="cont" id="cont-tr">
        <div class="box"></div>
    </div>
    <div class="cont">
        content3
    </div>


    <script>

    </script>
</body>
- 기본 사용
gsap.to(".box",{
    scrollTrigger: {
        trigger:"#cont-tr",
        markers: true,
        start:"top 50%",
    },
    x:400,
});
trigger : "요소" 요소가 화면에 보여지면 애니메이션이 시작함.
markers : true //디버깅 용도로 시작과 종료를 표시함
start : "시작점" top 50% or top 100 // 트리거 요소 상단이 뷰포트 상단 50% or 100px
end : "종료점" 종료되는 형태
scrub : true // 스크롤 위치에 따라 애니메이션이 재생됨
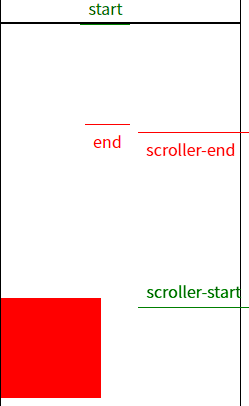
- scrub 사용
박스를 기준점으로 top이 화면의 50%일때 시작
바닥이 화면의 30% 일때 종료
gsap.to(".box",{
    scrollTrigger: {
        trigger:".box",
        markers: true,
        start:"top 50%",
        end: "bottom 30%",
        scrub: true,
    },
    x:400,
});
이벤트 시작

이벤트 종료

- pin 요소고정
gsap.to(".box",{
    scrollTrigger: {
        trigger:".box",
        markers: true,
        start:"top 50%",
        end: "bottom 30%",
        scrub: true,
        pin : true,
    },
    backgroundColor : "red",
});
박스가 보이면 박스에서 색변경
시작

화면에 고정되며 이동

고정 종료 / 애니메이션 종료
- timeline과 활용
let tl = gsap.timeline({
    scrollTrigger: {
        trigger:".box",
        markers: true,
        start:"top 50%",
        end: "bottom 30%",
        scrub: true,
        pin : true,
    },
});
tl.to(".box", { x: 200 }).to(".box", { rotation: 360 });
○ 활용1 - 스크롤에 따라 이미지 옆으로 돌리기
<style>
    .cont{
        height: 150vh;
        font-size: 80px;
        text-align: center;
        border: 1px solid #000;
    }
    .box{
        width: 600px;
        height: 300px;
        overflow: hidden;
        border: 1px solid #000;
    }
    .s-box{
        width: 200%;
        height: 300px;
        display: flex;
    }
    .s-box > img{
        width: 50%;
        height: 300px;
    }

</style>
<body>

    <div class="cont">
        content1
    </div>
    <div class="cont" id="cont-tr">
        <div class="box">
            <div class="s-box">
                <img src="https://picsum.photos/id/237/600/300" alt="">
                <img src="https://picsum.photos/id/100/600/300" alt="">
            </div>
        </div>
    </div>
    <div class="cont">
        content3
    </div>
</body>
- 이미지의 너비를 확인해서 "600px" 인데 -로 600px 이동 "-"+"600px" == "-600px"
let bi = getComputedStyle(document.querySelector(".s-box > img")).width;
let tl = gsap.timeline({
    scrollTrigger: {
        trigger:".box",
        markers: true,
        start:"top 60%",
        end: "top 30%",
        scrub: true,
    },
});
tl.to(".s-box", { x: "-"+bi});

○ 위로 넘어가기
.s-box{
    /* flex 해제 높이 100%*/
    height: 200%;
}
.s-box > img{
    /* 크기 조절 박스로 변경*/
    display: block;
    width: 100%;
    height: 300px;
}
let bi = getComputedStyle(document.querySelector(".s-box > img")).height; //높이 변경
let tl = gsap.timeline({
    scrollTrigger: {
        trigger:".box",
        markers: true,
        start:"top 60%",
        end: "top 30%",
        scrub: true,
    },
});
tl.to(".s-box", { y: "-"+bi}); //y축변경
○ toggleActions
ScrollTrigger가 트리거될 때 애니메이션이 어떻게 반응할지 네 가지 상태로 정의할 수 있는 옵션
toggleActions : "onEnter onLeave onEnterBack onLeaveBack"
onEnter: 트리거 영역에 진입할 때 실행할 동작.
onLeave: 트리거 영역에서 벗어날 때 실행할 동작.
onEnterBack: 트리거 영역에 뒤로(역방향) 진입할 때 실행할 동작.
onLeaveBack: 트리거 영역에서 뒤로(역방향) 벗어날 때 실행할 동작.
- 가능한 동작
"play": 애니메이션을 재생
"pause": 애니메이션을 일시정지
"resume": 일시정지된 애니메이션을 재개
"reverse": 애니메이션을 역방향으로 재생
"restart": 애니메이션을 처음부터 다시 시작
"reset": 애니메이션을 초기 상태로 되돌리고 정지
"complete": 애니메이션을 끝까지 진행
"none": 아무 동작도 하지 않음
예시
<style>
    .cont{
        height: 150vh;
        border: 1px solid #000;
    }
    .cont2 {
        height: 400px;
    }
    .box{
        width: 100px;
        height: 100px;
        background-color: aqua;
    }
</style>
<body>
    <div class="cont"></div>
    <div class="cont cont2">
        <div class="box"></div>
    </div>
    <div class="cont"></div>

    <script>
        gsap.to(".box", {
            scrollTrigger: {
                trigger: ".cont2",
                start: "top center",
                end: "bottom center",
                toggleActions: "play pause reverse reset",
                // 들어올때 시작 나갈때 정지 아래서 들어올때 반대로 나갈때 초기화
                markers:true,
            },
            x: 200,
            duration: 2,
        });
    </script>
</body>
○ toggleClass
스크롤 위치에 따라 특정 클래스(class)를 요소에 추가하거나 제거할 수 있다.
toggleClass: {targets: 요소, className: "클래스명"}
.box{
    width: 100px;
    height: 100px;
    background-color: aqua;
    transition: all 2s;
}
.act{
    background-color: red;
}
gsap.to(".box", {
    scrollTrigger: {
        trigger: ".cont2",
        start: "top center",
        end: "bottom 60%",
        markers:true,
        toggleClass : {
            targets : ".box",
            className : "act",
        }
    },
});'HTML + CSS > Javascript' 카테고리의 다른 글
| Js - Fullpage (1) | 2024.10.08 |
|---|---|
| Js - Swiper (4) | 2024.10.07 |
| Java Script 기초 (4) | 2024.09.09 |